都知道 Polymer 以 WebComponents 为基础,其实 Vue 也有与之结合的插件,代码不多,最近抽空研究了一下。
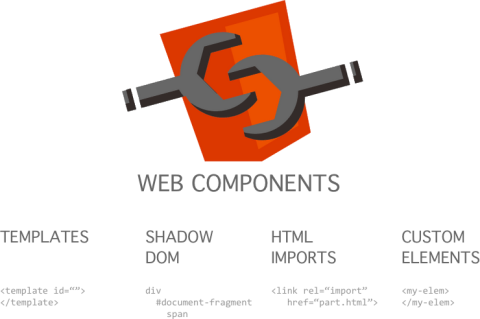
首先我们都知道 Web Components 由 4 个标准组成:
- HTML imports
- HTML template
- Custom Elements
- Shadow DOM
前两个标准算是基础部分,先介绍下 Custom Elements,值得一提的是这个标准本身也发生过重大修改,最新的版本是 v1。
Custom Elements 介绍
我们知道浏览器遇到不认识的标签会忽略,Custom Elements 可以帮助扩充浏览器的词汇表。
先来看一下用法,我们可以使用 ES6 的 class 语法声明一个自定义标签,然后使用全局 API 进行注册。这样在 HTML 中,我们就可以直接使用 <app-drawer> 自定义标签了:
class AppDrawer extends HTMLElement {...}
window.customElements.define('app-drawer', AppDrawer);
用法很简单,重点是标签类的内容。在深入之前我们不妨思考一个问题,那就是如何将 JS 中的变量修改反映到 HTML 上,反之亦然。 为什么要这么做呢,原因有两个。首先是双向绑定的需要,其次在 HTML 上添加属性便于实现样式的切换。
我们希望在 CSS 中通过 HTML 属性改变样式:
app-drawer[disabled] {
    opacity: 0.5;
    pointer-events: none;
}
带着这个问题我们看看 API 都提供了哪些功能。
生命周期钩子
在自定义元素中,提供了若干生命周期钩子供我们扩展,其中包括:
- constructor
- connectedCallback/disconnectedCallback 插入/移除 DOM
- attributeChangedCallback 属性添加、移除、更新或替换
使用这些钩子我们就能完成 HTML 属性和 JS 变量的绑定。
映射 HTML property 到 JS attribute
首先,在 JS 中可以通过同名变量 getter/setter 设置 HTML 属性,类似 Vue 中的计算属性。
get disabled() {
    return this.hasAttribute('disabled');
}

set disabled(val) {
    if (val) {
        this.setAttribute('disabled', '');
    } else {
        this.removeAttribute('disabled');
    }
    // this.toggleDrawer();
}
反过来从 HTML 属性到 JS 变量就需要依靠之前的 attributeChangedCallback 钩子了。要触发这个钩子,必须先声明要监听的 HTML 属性,类似 Vue 中使用 data() 声明响应式数据:
static get observedAttributes() {
    return ['disabled', 'open'];
}
然后在钩子中就可以将 HTML 属性的变化值同步到 JS 变量中了:
attributeChangedCallback(name, oldValue, newValue) {}自定义元素内容
有了数据绑定机制,自定义元素的内容应该如何设置呢?
首先想到,由于 this 可以访问 DOM API,所以可以在 connectedCallback 钩子中直接插入内容:
connectedCallback() {
this.innerHTML = "<b>I'm an x-foo-with-markup!</b>";
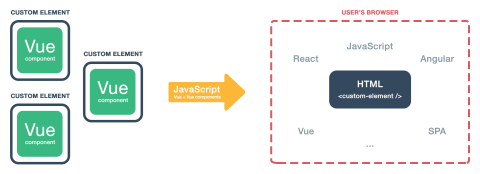
}Vue + Custom Elements
从前面的介绍我们能看出来,虽然提供了 HTML 属性到 JS 变量的映射机制,但是 HTML template 并没有双向绑定语法,在使用时还是免不了大量 DOM 操作。
Polymer 为了解决这些问题做了大量的封装。Vue 的一个插件 vue-custom-element 也能帮助我们更加便捷地使用 Custom Elements。 另外,我们之前省略了 Shadow DOM 在组件封装上的好处。
使用方法
用法有点类似将 .vue 中的部分模版挪到 HTML 中直接使用,而且由于不存在挂载点,也不需要手动执行 $mount() 操作。
另外,将 props 属性绑定到了 DOM 上,修改可以直接触发 HTML 内容改变。
<widget-vue prop1="1" prop2="string" prop3="true"></widget-vue>

Vue.customElement('widget-vue', {
    props: [
        'prop1',
        'prop2',
        'prop3'
    ],
    data: {
        message: 'Hello Vue!'
    },
    template: '<p>, , , </p>'
});

document.querySelector('widget-vue').prop2 // get prop value
document.querySelector('widget-vue').prop2 = 'another string' // set prop value
来看看内部对于 Custom Elements 的封装细节吧。
注册 Vue 插件
从上面的使用方式上可以看出,将 Vue 组件的实例化融合到了 Custom Elements 的生命周期中。
首先是 Vue 插件化的安装方式,在 Vue 对象上挂载了全局性的注册方法 customElement():
function install(Vue) {
    Vue.customElement = function vueCustomElement(tag, componentDefinition, options = {}) {
        const CustomElement = registerCustomElement(tag, {
            constructorCallback() {}
            connectedCallback() {}
            disconnectedCallback() {}
            attributeChangedCallback(name, oldValue, value) {}
            observedAttributes: props.hyphenate
        })
        return CustomElement;
    }
}
在创建 Custom Elements 工厂方法中,使用了标准的 API,将各个生命周期钩子应用上去。
// src/vue-custom-element.js

class CustomElement extends HTMLElement {}
customElements.define(tag, CustomElement);
获取属性
首先根据开发者声明的 props 属性,需要进行 camelCase 到连词符形式的转换。这是由于 HTML 中的属性需要连词符形式。 另外,由于 HTML 中属性都是以字符串形式存在,需要推断出真实的类型存储在 types 中。
// src/utils/props.js

export function getProps(componentDefinition = {}) {
    const props = {
        camelCase: [],
        hyphenate: [],
        types: {}
    };

    // 存储在 props.camelCase 中
    extractProps(componentDefinition.props, props);

    props.camelCase.forEach((prop) => {
        // 存储在 props.hyphenate 中
        props.hyphenate.push(hyphenate(prop));
    });

    return props;
}
从 HTML 中解析 props 属性对应的初始值:
// src/utils/props.js

export function getPropsData(element, componentDefinition, props) {
    const propsData = componentDefinition.propsData || {};

    props.hyphenate.forEach((name, index) => {
        const propCamelCase = props.camelCase[index];
        const propValue = element.attributes[name] || element[propCamelCase];

        let type = null;
        if (props.types[propCamelCase]) {
            type = props.types[propCamelCase];
        }

        propsData[propCamelCase] = propValue instanceof Attr
            ? convertAttributeValue(propValue.value, type)
            : propValue;
    });

    return propsData;
}
自定义事件
在 Vue 的生命周期中,我们扩展了 $emit() 方法,在 Vue 原有父子组件事件传递机制的基础上,增加了自定义事件的触发:
// src/utils/createVueInstance.js

function beforeCreate() {
    this.$emit = function emit(...args) {
        customEmit(element, ...args);
        this.__proto__ && this.__proto__.$emit.call(this, ...args);
    };
}
实例化 Vue
在浏览器检测到使用的 Custom Elements 时,执行 connectedCallback 钩子。
在这里我们完成了对应的 Vue 组件的实例化。另外,同样支持异步组件。
connectedCallback() {
    const asyncComponentPromise = isAsyncComponent
        && componentDefinition();
    const isAsyncComponentPromise = asyncComponentPromise
        && asyncComponentPromise.then
        && typeof asyncComponentPromise.then === 'function';

    if (!this.__detached__) {
        if (isAsyncComponentPromise) {
            asyncComponentPromise.then((lazyLoadedComponent) => {
                const lazyLoadedComponentProps = getProps(lazyLoadedComponent);
                createVueInstance(this, Vue, lazyLoadedComponent, lazyLoadedComponentProps, options);
            });
        } else {
            createVueInstance(this, Vue, componentDefinition, props, options);
        }
    }

    this.__detached__ = false;
}
在 Vue 实例的配置对象中,有几点需要注意:
- 使用之前从 HTML 中解析好的属性初始值,传入 propsData
- render 函数中使用
getSlots()获取子节点内容 - Vue 实例存储在 DOM 节点的
__vue_custom_element__属性上
// src/utils/createVueInstance.js

rootElement = {
    propsData,
    props: props.camelCase,
    computed: {
        reactiveProps() {
            const reactivePropsList = {};
            props.camelCase.forEach((prop) => {
                reactivePropsList[prop] = this[prop];
            });

            return reactivePropsList;
        }
    },
    render(createElement) {
        const data = {
            props: this.reactiveProps
        };

        return createElement(
            ComponentDefinition,
            data,
            getSlots(elementOriginalChildren, createElement)
        );
    }
};
// 实例化
element.__vue_custom_element__ = new Vue(rootElement);
后续做一些收尾工作,包括:
- 让 props 响应式
- 移除掉 DOM 元素上的
vce-cloak,此前通过样式控制未解析完成的自定义元素不可见 - 添加
vce-ready标记并触发事件
reactiveProps(element, props);

element.__vue_custom_element_props__ = props;
// 省略 Shadow DOM 的挂载
element.removeAttribute('vce-cloak');
element.setAttribute('vce-ready', '');
customEmit(element, 'vce-ready');
响应式
为了实现修改 DOM 属性到 Vue props 的关联,前面介绍过 Custom Elements 的监听 HTML 属性方式。 这里修改 Vue 实例上的属性,完成重绘。
attributeChangedCallback(name, oldValue, value) {
    if (this.__vue_custom_element__ && typeof value !== 'undefined') {
        const nameCamelCase = camelize(name);
        const type = this.__vue_custom_element_props__.types[nameCamelCase];
        this.__vue_custom_element__[nameCamelCase] = convertAttributeValue(value, type);
    }
},
observedAttributes: props.hyphenate
为了便捷地使用 DOM 属性,例如这样:document.querySelector('widget-vue1').prop1 = 'new Value'。
需要使用 getter/setter 代理 DOM 属性到 Vue props 上:
export function reactiveProps(element, props) {
    props.camelCase.forEach((name, index) => {
        Object.defineProperty(element, name, {
            get() {
                return this.__vue_custom_element__[name];
            },
            set(value) {
                if ((typeof value === 'object' || typeof value === 'function')
                    && this.__vue_custom_element__) {
                    const propName = props.camelCase[index];
                    this.__vue_custom_element__[propName] = value;
                } else {
                    const type = props.types[props.camelCase[index]];
                    this.setAttribute(props.hyphenate[index], convertAttributeValue(value, type));
                }
            }
        });
    });
}
另一方面,props 修改也需要反映到 HTML 属性上。有两种方式:
- 使用之前提到过的
$emit()触发自定义事件,然后在 DOM 中监听事件完成 HTML 属性的设置 - 使用
$el.prop1,由于上面已经完成了 DOM 属性的代理,在 setter 中会自动调用setAttribute()完成设置
Slot
最后我们来看看使用 Vue render 函数时,创建子元素的过程。
对于文本节点,使用 <span> 包裹。而对于其他类型节点,保留原本的标签名和 DOM 属性,如果有 slot 需要从 attrs 中挑出来放到 createElement() 的参数选项上。
export function getSlots(children = [], createElement) {
    const slots = [];
    toArray(children).forEach((child) => {
        // 处理文本节点
        if (child.nodeName === '#text') {
            if (child.nodeValue.trim()) {
                slots.push(createElement('span', child.nodeValue));
            }
        } else if (child.nodeName !== '#comment') {
            const attributes = getAttributes(child);
            const elementOptions = {
                attrs: attributes,
                domProps: {
                    innerHTML: child.innerHTML
                }
            };

            if (attributes.slot) {
                elementOptions.slot = attributes.slot;
                // 从 attrs 中删除
                attributes.slot = undefined;
            }

            slots.push(createElement(child.tagName, elementOptions));
        }
    });
    return slots;
}
遇到包含 vue-slot 属性的节点就认为是 slot。
export function getAttributes(children) {
    const attributes = {};

    toArray(children.attributes).forEach((attribute) => {
        attributes[attribute.nodeName === 'vue-slot'
            ? 'slot' : attribute.nodeName] = attribute.nodeValue;
    });

    return attributes;
}
从这里可以看出,遇到 Vue 不认识的组件标签,也会原样输出。这里在开发模式下就会出现 Warning。 这个问题在插件中也有说明,可以使用 ignoredElements 忽略。