渲染
在上一篇文章中我们了解了 State 全局状态机,StateSet 状态集以及 StateGraph 之间的关系。
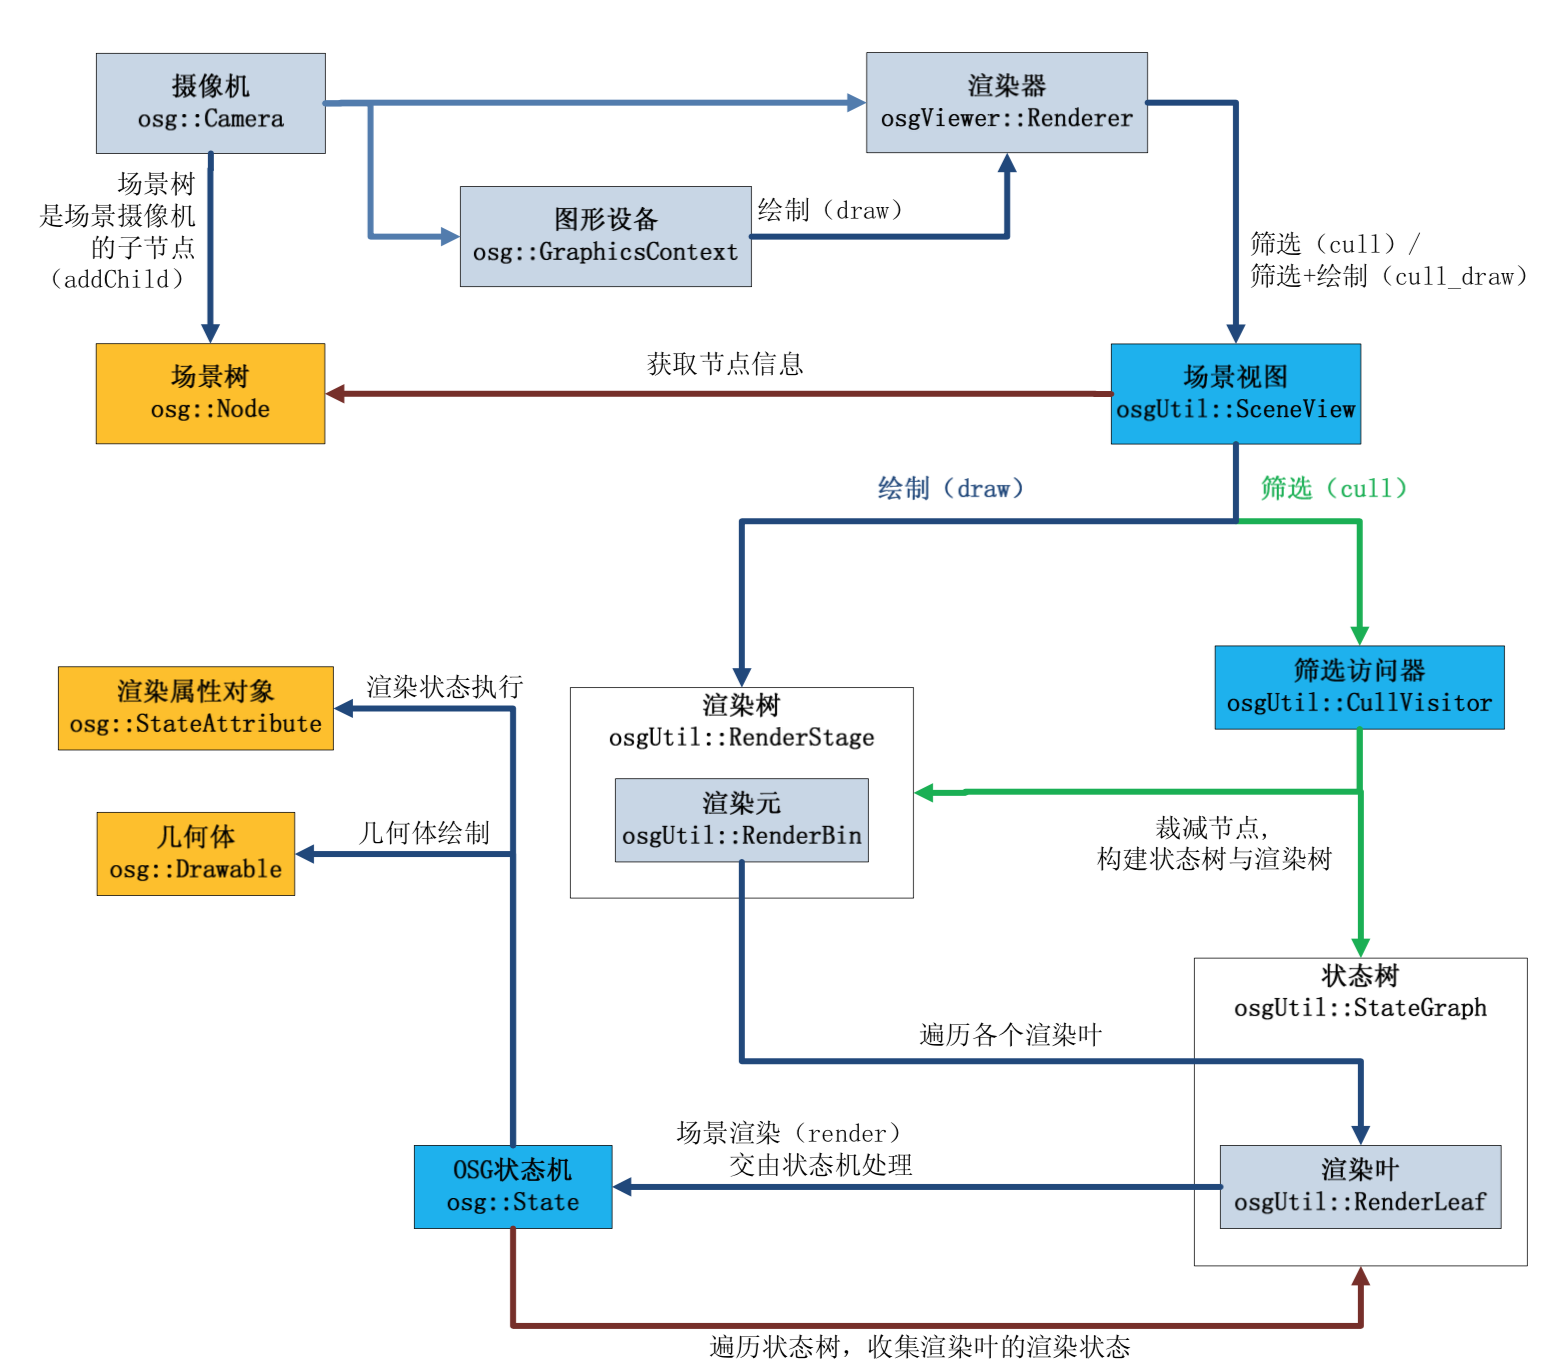
这里先引用王锐「OSG 最长的一帧」中涉及渲染的若干类之间的关系图,其中涉及状态的类我们已经有所了解,本文将重点关注渲染相关的类:
渲染流程
首先找到每一帧的渲染方法 frame(),这里省略了调整视口、处理用户输入以及时长统计等操作:
// Viewer.js
frame: function() {
    this.beginFrame();
    // 调整帧时间
    this.advance();

    // update viewport if a resize occured
    var canvasSizeChanged = this.updateViewport();

    // update inputs
    // setup framestamp
    // Update Manipulator/Event

    if (this.checkNeedToDoFrame() || canvasSizeChanged) {
        this._requestRedraw = false;
        // 更新 StateGraph 渲染树
        this.updateTraversal();
        // 遍历渲染树
        this.renderingTraversal();
    }

    this.endFrame();
},
更新 StateGraph 渲染树:
updateTraversal: function() {
    this.getScene().updateSceneGraph(this._updateVisitor);
},
遍历节点,实际渲染:
renderingTraversal: function() {
    if (this.getCamera()) {
        var renderer = this.getCamera().getRenderer();
        renderer.cull(); // 裁剪
        renderer.draw(); // 渲染
    }
},
现在我们不继续深入裁剪甚至渲染方法,先来看看遍历节点中涉及的 _updateVisitor 和 _cullVisitor 这两个重要对象。
访问者模式
涉及到场景图(树)中的节点遍历,访问者模式是很常用的:
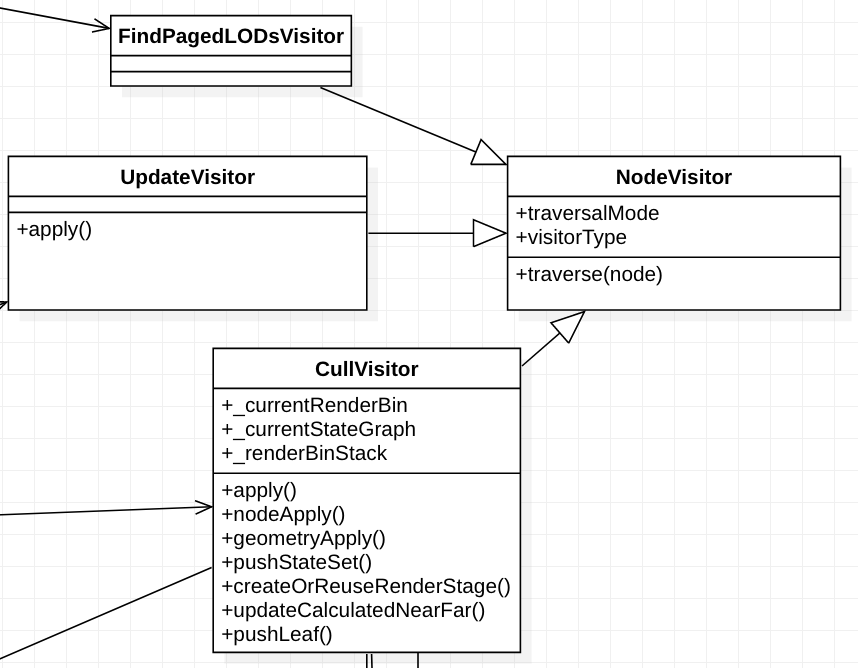
作为基类 NodeVisitor,提供了三种遍历方式和三种访问者类型:
// NodeVisitor.js

// 遍历模式
NodeVisitor.TRAVERSE_PARENTS = 1;
NodeVisitor.TRAVERSE_ALL_CHILDREN = 2;
NodeVisitor.TRAVERSE_ACTIVE_CHILDREN = 3;

// 访问者类型
NodeVisitor.NODE_VISITOR = 0;
NodeVisitor.UPDATE_VISITOR = 1;
NodeVisitor.CULL_VISITOR = 2;

// 调用访问节点的方法,可被子类重载。默认行为简单继续遍历子树。
apply: function(node) {
    this.traverse(node);
},场景遍历入口,_sceneData 通常是场景图的根节点,以此构建一棵完整的场景树:
// Scene.js
updateSceneGraph: function(updateVisitor) {
    // 调用节点的 accept()
    if (this._sceneData) this._sceneData.accept(updateVisitor);
}
在节点的 accept() 中委托 NodeVisitor 继续遍历:
// Node.js
accept: function(nv) {
    if (nv.validNodeMask(this)) {
        nv.pushOntoNodePath(this);
        nv.apply(this);
        nv.popFromNodePath();
    }
},
UpdateVisitor
UpdateVisitor 作为 NodeVisitor 的子类,重载了 apply(),会分别调用 StateSet 和 Node 上注册的更新回调。
在 OSG 内部实现中 osgAnimation 模块会使用到:
apply: function(node) {
    // 取出节点上关联的 StateSet
    var stateSet = node.getStateSet();
    if (stateSet && stateSet.requiresUpdateTraversal()) {
        var updateCallbackList = stateSet.getUpdateCallbackList();

        // 调用 StateSet 的 update 回调,附带上 StateSet
        var numStateSetUpdateCallback = updateCallbackList.length;
        if (numStateSetUpdateCallback) {
            this._numUpdateCallback += numStateSetUpdateCallback;
            for (var i = 0, l = numStateSetUpdateCallback; i < l; i++)
                updateCallbackList[i].update(stateSet, this);
        }
    }

    // 调用节点上的 update 回调
    var ncs = node.getUpdateCallbackList();
    var numUpdateCallback = ncs.length;
    for (var j = 0; j < numUpdateCallback; j++) {
        this._numUpdateCallback++;
        if (!ncs[j].update(node, this)) {
            return;
        }
    }
    // 继续遍历子节点
    if (node.getNumChildrenRequiringUpdateTraversal() > 0) this.traverse(node);
}
下面我们来看最重要的 CullVisitor,顾名思义,它负责遍历并裁减场景,但更重要的是在遍历过程中会构建 StateGraph 渲染树和 StateSet 状态树。
CullVisitor
从不同节点类型注册的 apply 方法就可以看出,
// CullVisitor.js
cullVisitorHelper.registerApplyFunction(Node.nodeTypeID, nodeApply);
cullVisitorHelper.registerApplyFunction(Switch.nodeTypeID, nodeApply);
cullVisitorHelper.registerApplyFunction(PagedLOD.nodeTypeID, nodeApply);
cullVisitorHelper.registerApplyFunction(Camera.nodeTypeID, cameraApply);
cullVisitorHelper.registerApplyFunction(MatrixTransform.nodeTypeID, matrixTransformApply);
cullVisitorHelper.registerApplyFunction(Projection.nodeTypeID, projectionApply);
cullVisitorHelper.registerApplyFunction(Geometry.nodeTypeID, geometryApply);
// 省略更多实现...

// 根据节点类型调用注册的 apply 方法
apply: function(node) {
    this.applyFunctionArray[node.nodeTypeID].call(this, node);
},
视锥裁剪 isCulled 放在了在基础实现中,随后通过节点上附带的 StateSet 入栈出栈构建起状态树:
// CullVisitor.js
var nodeApply = function(node) {
    this._numNode++;

    // Camera and lights must enlarge node parent bounding boxes for this not to cull
    if (this.isCulled(node, this.nodePath)) {
        return;
    }

    // push the culling mode.
    this.pushCurrentMask();

    var stateset = node.getStateSet();
    if (stateset) this.pushStateSet(stateset);

    this.handleCullCallbacksAndTraverse(node);

    if (stateset) this.popStateSet();

    // pop the culling mode.
    this.popCurrentMask();
};
关于具体视锥裁剪的实现我们会放到后面介绍,这里先关注状态树的构建过程。
构建状态树
先让我们回到 Renderer 的初始化方法中,在这里我们初始化了全局 State 状态机、根节点(相机节点)的 StateSet 以及 StateGraph:
// Renderer.js
setDefaults: function() {
    // 全局状态机
    this._state = new State(new osgShader.ShaderGeneratorProxy());

    this._cullVisitor = new CullVisitor();
    this._cullVisitor.setRenderer(this);
    // 初始化 StateGraph
    this._stateGraph = new StateGraph();

    this.getCamera().setClearColor(vec4.create());
    this.setRenderStage(new RenderStage());

    var osg = require('osg/osg').default;
    // 初始化 StateSet
    var stateSet = this.getCamera().getOrCreateStateSet();
    stateSet.setAttributeAndModes(new osg.Material());
    stateSet.setAttributeAndModes(new osg.Depth());
    stateSet.setAttributeAndModes(new osg.BlendFunc());
    stateSet.setAttributeAndModes(new osg.CullFace());
},
在实际渲染流程之前,首先需要经历裁剪流程:
// Renderer.js
cull: function() {
    var camera = this.getCamera();
    var view = camera.getView();

    // reset all stateGraph per frame
    StateGraph.reset();
    this._stateGraph.clean();

    this._renderStage.reset();

    this._cullVisitor.reset();
    this._cullVisitor.setStateGraph(this._stateGraph);
    this._cullVisitor.setRenderStage(this._renderStage);

    this._cullVisitor.pushStateSet(camera.getStateSet());
    // 省略...
    this._cullVisitor.popStateSet();

    // 按状态排序排序
    this._renderStage.sort();
}
现在回到 CullVisitor 中,首先将当前节点的 StateSet 添加到对应的 StateGraph 上:
// CullVisitor.js
pushStateSet: function(stateset) {
    this._currentStateGraph = this._currentStateGraph.findOrInsert(stateset);
    // 省略...
},
向 StateGraph 添加 StateSet 时,会记录下 _depth 深度值,在前文中提到过后续会用于状态迁移:
// StateGraph.js
findOrInsert: function(stateset) {
    var stateSetID = stateset.getInstanceID();
    var childrenMap = this._children.getMap();
    var sg = childrenMap[stateSetID];
    if (!sg) {
        sg = StateGraph.pooledStateGraph.getOrCreateObject();
        sg.clean();

        sg._parent = this;
        // 记录深度值
        sg._depth = this._depth + 1;
        sg._stateset = stateset;
        this._children.set(stateSetID, sg);
    }
    return sg;
}
构建渲染树
除了构建 StateGraph 状态树,这里还引入了 RenderBin 的概念,在 CullVisitor 中维护了一个 RenderBin 的栈来记录层次结构。
// CullVisitor.js
pushStateSet: function(stateset) {
    this._currentStateGraph = this._currentStateGraph.findOrInsert(stateset);
    if (stateset.getBinName() !== undefined) {
        // 记录层次
        var renderBinStack = this._renderBinStack;
        var currentRenderBin = this._currentRenderBin;
        renderBinStack.push(currentRenderBin);
        this._currentRenderBin = currentRenderBin
            .getStage()
            .findOrInsert(stateset.getBinNumber(), stateset.getBinName());
    }
},
// RenderBin.js
findOrInsert: function(binNum, binName) {
var bins = this._bins.getMap();
var bin = bins[binNum];
if (!bin) {
bin = this._createRenderBin(binName);
bin._parent = this;
bin._binNum = binNum;
bin._renderStage = this._renderStage;
this._bins.set(binNum, bin);
}
return bin;
},那么一个 StateSet 的 binNum 和 binName 如何设置呢?
// StateSet.js
setRenderingHint: function(hint) {
    if (hint === 'OPAQUE_BIN') {
        this.setRenderBinDetails(0, 'RenderBin');
    } else if (hint === 'TRANSPARENT_BIN') {
        this.setRenderBinDetails(10, 'DepthSortedBin');
    } else {
        this.setRenderBinDetails(0, '');
    }
},
Geometry 叶节点
在所有节点中,叶节点是特殊的存在,在 OSG 中为 Geometry。 当 CullVisitor 遍历到 Geometry 节点时,:
// CullVisitor.js
var geometryApply = function(node) {
    // 省略裁剪相关

    var stateset = node.getStateSet();
    if (stateset) this.pushStateSet(stateset);

    var depth = 0;
    if (bb.valid()) {
        depth = this.distance(bb.center(tempVec), modelview);
    }
    this.pushLeaf(node, depth);
    if (stateset) this.popStateSet();
};
这里涉及到了一个新的类 RenderLeaf,它是渲染树中的叶节点:
pushLeaf: function(node, depth) {
    var leafs = this._currentStateGraph.getLeafs();
    if (!leafs.getLength()) {
        this._currentRenderBin.addStateGraph(this._currentStateGraph);
    }

    var leaf = this.createOrReuseRenderLeaf();
    leaf.init(
        this._currentStateGraph,
        node,
        this.getCurrentProjectionMatrix(),
        this.getCurrentViewMatrix(),
        this.getCurrentModelViewMatrix(),
        this.getCurrentModelMatrix(),
        depth
    );
    leafs.push(leaf);
}
开始渲染
Renderer 将实际渲染交由 RenderStage 处理:
// Renderer.js
draw: function() {
    var state = this.getState();

    this._renderStage.setCamera(this._camera);
    this._renderStage.draw(state);
    this._renderStage.setCamera(undefined);

    // 恢复初始状态
    state.applyDefault();
}
在 RenderStage 中,可以实现后处理:
// RenderStage.js
draw: function(state, previousRenderLeaf) {
    var previousLeaf = this.drawPreRenderStages(state, previousRenderLeaf);
    previousLeaf = this.drawImplementation(state, previousLeaf);
    previousLeaf = this.drawPostRenderStages(state, previousLeaf);

    return previousLeaf;
},
RenderStage 的渲染过程中,完成 clear 之后交由 RenderBin 继续处理:
// RenderStage.js
drawImplementation: function(state, previousRenderLeaf) {
    var gl = state.getGraphicContext();

    // camera viewport
    this.applyCamera(state);
    state.applyAttribute(this._viewport);
    if (this._scissor) {
        state.applyAttribute(this._scissor);
    }

    // clear
    if (this._clearMask !== 0x0) {
        if (this._clearMask & gl.COLOR_BUFFER_BIT) {
            state.clearColor(this._clearColor);
        }
        if (this._clearMask & gl.DEPTH_BUFFER_BIT) {
            state.depthMask(true);
            state.clearDepth(this._clearDepth);
        }
        state.clear(this._clearMask);
    }

    if (this._positionedAttribute.getLength() !== 0) {
        this.applyPositionedAttribute(state, this._positionedAttribute);
    }

    var previousLeaf = RenderBin.prototype.drawImplementation.call(
        this,
        state,
        previousRenderLeaf
    );

    return previousLeaf;
}
这里是一个递归调用,使用 drawLeafs 渲染 RenderLeaf:
// RenderBin.js
drawImplementation: function(state, previousRenderLeaf) {
    var previousLeaf = previousRenderLeaf;

    // 1. 省略 Bin 排序

    var bin;
    // 2. draw pre bins
    for (; current < end; current++) {
        bin = binsArray[current];
        if (bin.getBinNumber() > 0) {
            break;
        }
        previousLeaf = bin.draw(state, previousLeaf);
    }

    // 3. draw leafs
    previousLeaf = this.drawLeafs(state, previousLeaf);

    // 4. draw post bins
    for (; current < end; current++) {
        bin = binsArray[current];
        previousLeaf = bin.draw(state, previousLeaf);
    }
    return previousLeaf;
},
渲染 RenderLeaf
// RenderBin.js
drawLeafs: function(state, previousRenderLeaf) {
    var stateList = this._stateGraphList.getArray();
    var stateListLength = this._stateGraphList.getLength();
    var leafs = this._leafs;
    var previousLeaf = previousRenderLeaf;
    var leaf;

    // draw fine grained ordering.
    for (var d = 0, dl = leafs.length; d < dl; d++) {
        leaf = leafs[d];
        leaf.render(state, previousLeaf);
        previousLeaf = leaf;
    }

    // draw coarse grained ordering.
    for (var i = 0, l = stateListLength; i < l; i++) {
        var sg = stateList[i];
        var leafArray = sg._leafs.getArray();
        var leafArrayLength = sg._leafs.getLength();
        for (var j = 0; j < leafArrayLength; j++) {
            leaf = leafArray[j];
            leaf.render(state, previousLeaf);
            previousLeaf = leaf;
        }
    }
    return previousLeaf;
}
在渲染叶节点时,为了减少连续绘制过程中的重复调用,在 OSG 中就是 StateSet 的切换效率,需要考虑当前节点与前一个节点的关系。 在源码注释中列举了三种场景:
// pRG: previousRenderGraph
// cRG: currentRenderGraph
// pRL: previousRenderLeaf
// cRL: currentRenderLeaf
// each RG contains a StateSet
//
//          A                        B                       C
// +-----+     +-----+            +-----+                 +-----+
// | pRG |     | cRG |         +--+ RG  +--+              | RG  |
// +--+--+     +--+--+         |  +-----+  |              +--+--+
//    |           |            |           |                 |
// +--v--+     +--v--+      +--v--+     +--v--+           +--v--+
// | pRG |     | cRG |      | pRG |     | cRG |        +--+ RG  +--+
// +--+--+     +--+--+      +--+--+     +--+--+        |  +-----+  |
//    |           |            |           |           |           |
// +--v--+     +--v--+      +--v--+     +--v--+     +--v--+     +--v--+
// | pRL |     | cRL |      | pRL |     | cRL |     | pRL |     | cRL |
// +-----+     +-----+      +-----+     +-----+     +-----+     +-----+
//
// Case A
// no common parent StateGraphNode we need to
// popStateSet until we find the common parent and then
// pushStateSet from the common parent to the current
// RenderLeaf
//
// Case B
// common parent StateGraphNode so we apply the current stateSet
//
// Case C
// the StateGraphNode is common to the previous RenderLeaf so we dont need
// to do anything except if we used an insertStateSet
针对上述三种情况完成 StateSet 的切换后,全局状态机 State 会调用 applyStateSet() 应用状态集合,调用底层 API。
随后通过 drawGeometry() 调用 Geometry 子类的具体实现方法:
// RenderLeaf.js
render: (function() {
    var idLastDraw = 0;
    var lastStateSetStackSize = -1;

    return function(state, previousLeaf) {
        var prevRenderGraph;
        var prevRenderGraphParent;
        var curRenderGraph = this._parent;
        var curRenderGraphParent = curRenderGraph._parent;
        var curRenderGraphStateSet = curRenderGraph._stateset;

        if (previousLeaf !== undefined) {
            // apply state if required.
            prevRenderGraph = previousLeaf._parent;
            prevRenderGraphParent = prevRenderGraph._parent;

            if (prevRenderGraphParent !== curRenderGraphParent) {
                // Case A
                StateGraph.moveStateGraph(state, prevRenderGraphParent, curRenderGraphParent);

                state.applyStateSet(curRenderGraphStateSet);
            } else if (curRenderGraph !== prevRenderGraph) {
                // Case B
                state.applyStateSet(curRenderGraphStateSet);
            } else {
                // Case C

                // in osg we call apply but actually we dont need
                // except if the stateSetStack changed.
                // for example if insert/remove StateSet has been used
                if (state._stateSetStackChanged(idLastDraw, lastStateSetStackSize)) {
                    state.applyStateSet(curRenderGraphStateSet);
                }
            }
        } else {
            StateGraph.moveStateGraph(state, undefined, curRenderGraphParent);
            state.applyStateSet(curRenderGraphStateSet);
        }

        state._setStateSetsDrawID(++idLastDraw);
        lastStateSetStackSize = state.getStateSetStackSize();

        this.drawGeometry(state);
    };
})()
总结
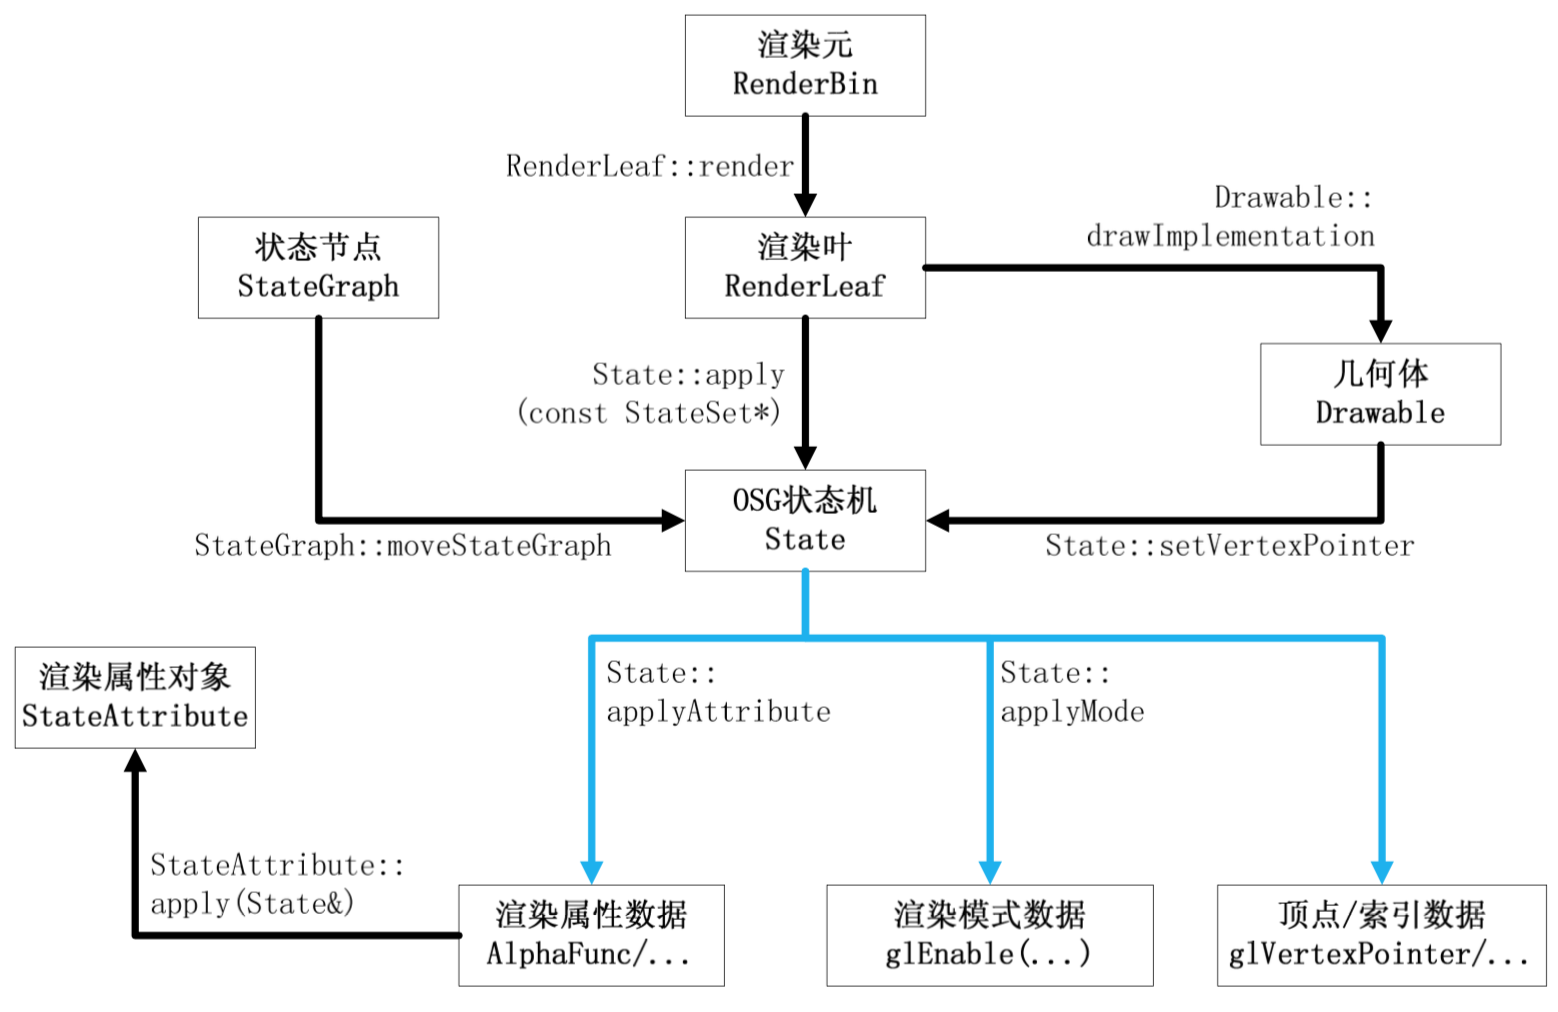
这里引用「OSG 最长的一帧」中总结的渲染全流程,图中的 Drawable 可以视为 Geometry:
在下一篇中,我们将深入更底层的 Shader 和 Program 相关内容。
参考资料
- 「OSG 最长的一帧」