「Photographic Tone Reproduction for Digital Images」🔗
「Gradient Domain High Dynamic Range Compression」🔗
「Tone mapping进化论」https://zhuanlan.zhihu.com/p/21983679
「Tone mapping: A quick survey」🔗
「Filmic Tonemapping Operators」🔗
「ACES Filmic Tone Mapping Curve」🔗
「Converting RGB to LogLuv in a fragment shader」🔗
「RGBM color encoding」🔗
「理解高范围动态光」🔗
「Three.js 实现」🔗
「Three.js 效果」🔗
http://examples.claygl.xyz/examples/basicPanoramaHDR.html
问题描述
亮处过曝,暗处太黑丢失细节。
The purpose of the Tone Mapping function is to map the wide range of high dynamic range (HDR) colors into low dynamic range (LDR) that a display can output. This is the last stage of post processing that is done after the normal rendering during post processing.
摄影学经验
摄影学中将 scene zone 映射到 print zone: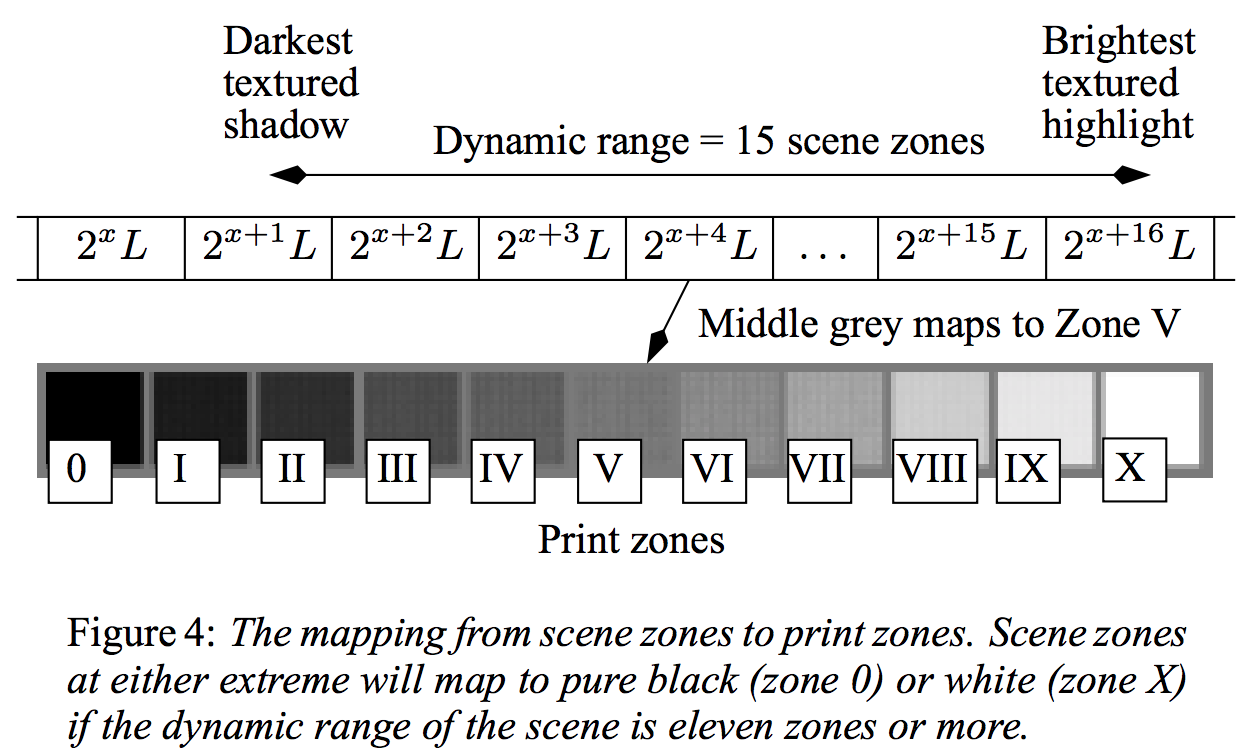
术语
- 动态范围 Dynamic range: In computer graphics the dynamic range of a scene is expressed as the ratio of the highest scene luminance to the lowest scene luminance
- 基调?Key: The key of a scene indicates whether it is subjectively light, normal, or dark. A white-painted room would be high-key, and a dim stable would be low-key
Reinhard 基础算法
首先计算出场景的基调(key),选取 N 个像素点的亮度进行 log 平均。这里原论文有一处错误 🔗:
调节像素点亮度时,需要用到 a 这个表示 normal-key 基调的值:
不同 a 取值效果如下,越大调节后自然越亮:
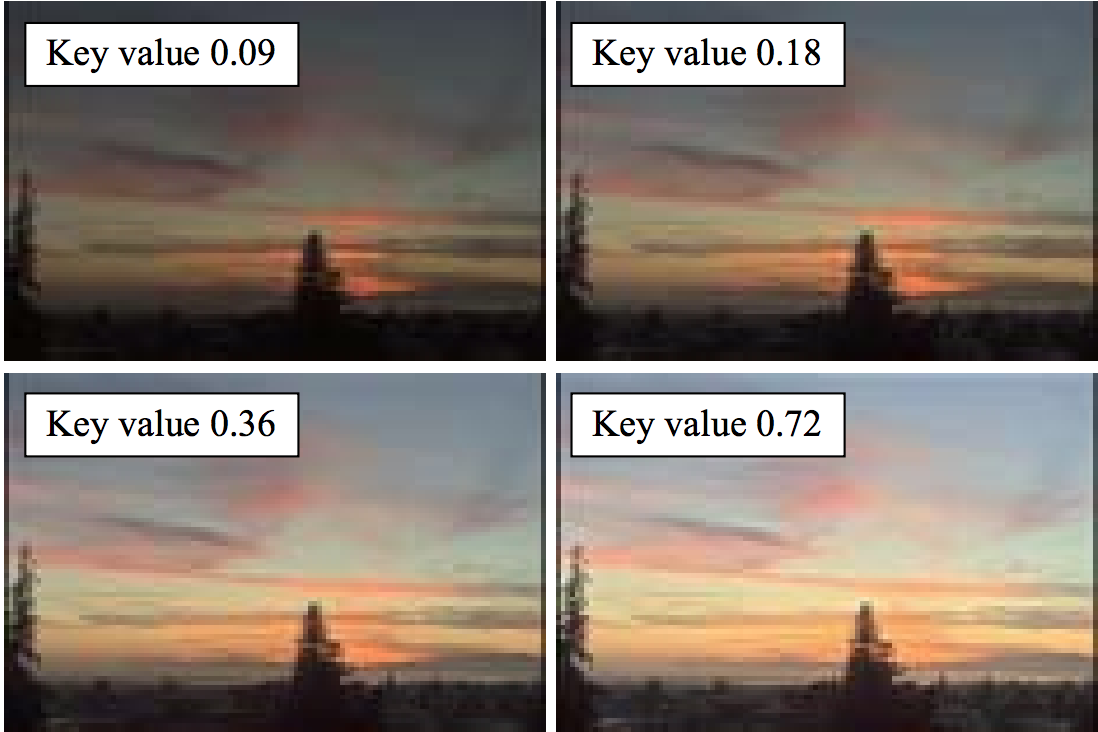
显然这种线性调节的效果在实际应用中是有问题的,Lwhite 是场景中的最高亮度:
但是仍不完美,尤其是在很高动态范围的场景下,依然会丢失细节。
改进
作者观察到,在传统打印技术中,为了提高打印结果的质量,通常会采用一种 dodying-and-burning 的方法。该方法的原理是根据打印内容的不同,在不同区域减少光亮度(dodying)或者增加光亮度(burning)。
所以关键是对于场景的基调的计算。
原论文中首先找出对比度大的边缘包围的区域,然后对该区域进行处理。
尋找區域亮度VV以強化亮部壓縮的細節就是該論文重點。論文中以DoG (difference of Gaussian)實作。當V和L相差較大時則會保留細節。這裡用到Blob detection的技巧,利用DoG或LoG (Laplician of Gaussian)來偵測一個合適的feature scale (在SIFT中最廣為人知),在這裡是尋找一個以 L 為中心的最大區塊使得內部的亮度最接近,並且該區塊沒有顯著的gradient變化。
因此,作者提出利用高斯核卷积的方法来找出这些区域。
WebGL 实现
基础版本 HDR
先来看基础算法的实现:
uniform float averageLuminance; // 场景中的平均亮度,默认值 1.0
uniform float middleGrey; // 公式中的 a,默认值 0.6
uniform float minLuminance; // 默认值 0.01
uniform float maxLuminance; // 默认值 16

vec3 ToneMap( vec3 vColor ) {
  #ifdef ADAPTED_LUMINANCE
  // 动态计算场景基调
  float fLumAvg = texture2D(luminanceMap, vec2(0.5, 0.5)).r;
  #else
  // 基础算法
  float fLumAvg = averageLuminance;
  #endif

  // 计算颜色对应的相对亮度,公式中的 Lw(x,y)
  float fLumPixel = linearToRelativeLuminance( vColor );

  // 首先进行线性调节
  float fLumScaled = (fLumPixel * middleGrey) / max( minLuminance, fLumAvg );

  // 引入 Lwhite
  float fLumCompressed = (fLumScaled * (1.0 + (fLumScaled / (maxLuminance * maxLuminance)))) / (1.0 + fLumScaled);
  return fLumCompressed * vColor;
}
这里涉及到亮度的计算,RGB 色彩空间到 CIE:
// https://en.wikipedia.org/wiki/Relative_luminance
float linearToRelativeLuminance( const in vec3 color ) {
	vec3 weights = vec3( 0.2126, 0.7152, 0.0722 );
	return dot( weights, color.rgb );
}
Adaptive HDR
下面来看改进版,并没有使用原论文中卷积的方式。
首先需要开启 OES_texture_float 扩展,让浮点帧缓冲可以存储超过 0.0 到 1.0 范围的浮点值。
// 开启扩展
if ( renderer.extensions.get( 'OES_texture_half_float_linear' ) ) {
	parameters.type = THREE.FloatType;
}
// 创建动态 HDR RenderTarget
var hdrRenderTarget = new THREE.WebGLRenderTarget( windowThirdX, height, parameters );
后处理中我们只需要关注 AdaptiveToneMappingPass:
var adaptToneMappingPass = new THREE.AdaptiveToneMappingPass( true, 256 );
adaptToneMappingPass.needsSwap = true;
// 全局辉光
var bloomPass = new THREE.BloomPass();
// gamma 校正
var gammaCorrectionPass = new THREE.ShaderPass( THREE.GammaCorrectionShader );
gammaCorrectionPass.renderToScreen = true;
原论文中使用卷积运算十分复杂,Three.js 使用了一种相对简单基于时间的方案:
首先初始化三个 RT:
// https://github.com/mrdoob/three.js/blob/master/examples/js/postprocessing/AdaptiveToneMappingPass.js

this.luminanceRT = new THREE.WebGLRenderTarget( this.resolution, this.resolution, pars );
this.luminanceRT.texture.name = "AdaptiveToneMappingPass.l";
this.luminanceRT.texture.generateMipmaps = false;

this.previousLuminanceRT = new THREE.WebGLRenderTarget( this.resolution, this.resolution, pars );
this.previousLuminanceRT.texture.name = "AdaptiveToneMappingPass.pl";
this.previousLuminanceRT.texture.generateMipmaps = false;

// We only need mipmapping for the current luminosity because we want a down-sampled version to sample in our adaptive shader
pars.minFilter = THREE.LinearMipMapLinearFilter;
pars.generateMipmaps = true;
this.currentLuminanceRT = new THREE.WebGLRenderTarget( this.resolution, this.resolution, pars );
this.currentLuminanceRT.texture.name = "AdaptiveToneMappingPass.cl";
然后输出亮度到 currentLuminanceRT 中:
// 简单调用 linearToRelativeLuminance 的 Shader
this.quad.material = this.materialLuminance;
this.materialLuminance.uniforms.tDiffuse.value = readBuffer.texture;
renderer.render( this.scene, this.camera, this.currentLuminanceRT );
然后取得当前帧到上一帧的差值,连同 previousLuminanceRT 一起传入 AdaptiveShader 中,输出结果到 luminanceRT 中:
this.materialAdaptiveLum.uniforms.delta.value = deltaTime;
this.materialAdaptiveLum.uniforms.lastLum.value = this.previousLuminanceRT.texture;
this.materialAdaptiveLum.uniforms.currentLum.value = this.currentLuminanceRT.texture;
renderer.render( this.scene, this.camera, this.luminanceRT );
最后拷贝计算结果 luminanceRT 到 previousLuminanceRT,完成当前渲染 pass:
this.quad.material = this.materialCopy;
this.copyUniforms.tDiffuse.value = this.luminanceRT.texture;
renderer.render( this.scene, this.camera, this.previousLuminanceRT );
所以关键就在 AdaptiveShader 的实现,如何计算出每个 fragment 的亮度。
这里使用了上一帧的亮度加上当前帧的差值乘以一个基于时间的系数:
uniform sampler2D lastLum; // 上一帧亮度
uniform sampler2D currentLum; // 当前帧亮度
uniform float minLuminance; // 0.01
uniform float delta; // 0.016
uniform float tau; // 1.0

void main() {

    vec4 lastLum = texture2D( lastLum, vUv, MIP_LEVEL_1X1 );
    vec4 currentLum = texture2D( currentLum, vUv, MIP_LEVEL_1X1 );

    float fLastLum = max( minLuminance, lastLum.r );
    float fCurrentLum = max( minLuminance, currentLum.r );

    //The adaption seems to work better in extreme lighting differences
    //if the input luminance is squared.
    fCurrentLum *= fCurrentLum;

    // Adapt the luminance using Pattanaik's technique
    float fAdaptedLum = fLastLum + (fCurrentLum - fLastLum) * (1.0 - exp(-delta * tau));
    gl_FragColor.r = fAdaptedLum;
}
值得注意的是,注释中提到使用的是 Pattanaik 的模型,但是我在网上查了下,也只找到这一篇,里面并没有具体的算法公式。直到后来在知乎上读到「Tone mapping进化论」,里面提到了用 exp 来模拟 S 曲线(Reinhard 改进版曲线也是 S 型),才理解到这个系数的由来:
float3 CEToneMapping(float3 color, float adapted_lum)
{
    return 1 - exp(-adapted_lum * color);
}
Filmic Tonemapping
这个方法的本质是把原图和让艺术家用专业照相软件模拟胶片的感觉,人肉 tone mapping 后的结果去做曲线拟合,得到一个高次曲线的表达式。这样的表达式应用到渲染结果后,就能在很大程度上自动接近人工调整的结果。
原作者在「Filmic Tonemapping Operators」🔗文章中详细介绍了一些人工调整,拟合参数的选择。
clay.gl 中也曾经采用过,不过目前 HDR 的实现选择了另一种 ACES,后面会介绍。
文章中介绍了几种实现:
Next up is the optimized formula by Jim Hejl and Richard Burgess-Dawson. I completely forgot about Richard in the GDC talk, but he shares the credit with Jim
// hdr.glsl

vec3 filmicToneMap(vec3 color)
{
    vec3 x = max(vec3(0.0), color - 0.004);
    return (x*(6.2*x+0.5))/(x*(6.2*x+1.7)+0.06);
}
原作者的实现:
// hdr.glsl

const vec3 whiteScale = vec3(11.2);

vec3 uncharted2ToneMap(vec3 x)
{
    const float A = 0.22;   // Shoulder Strength
    const float B = 0.30;   // Linear Strength
    const float C = 0.10;   // Linear Angle
    const float D = 0.20;   // Toe Strength
    const float E = 0.01;   // Toe Numerator
    const float F = 0.30;   //Toe Denominator

    return ((x*(A*x+C*B)+D*E)/(x*(A*x+B)+D*F))-E/F;
}

vec3 color = uncharted2ToneMap(tex) / uncharted2ToneMap(whiteScale);
这个方法开启了 tone mapping 的新路径,让人们知道了曲线拟合的好处。并且,其他颜色空间的变换,比如gamma 矫正,也可以一起合并到这个曲线里来,一次搞定,不会增加额外开销。缺点就是运算量有点大,两个多项式的计算,并且相除。
ACES
来自 Oscar 专业电影团队的成果:
他们发明的东西叫Academy Color Encoding System(ACES),是一套颜色编码系统,或者说是一个新的颜色空间。它是一个通用的数据交换格式,一方面可以不同的输入设备转成ACES,另一方面可以把ACES在不同的显示设备上正确显示。不管你是LDR,还是HDR,都可以在ACES里表达出来。这就直接解决了VDR的问题,不同设备间都可以互通数据。 然而对于实时渲染来说,没必要用全套ACES。因为第一,没有什么“输入设备”。渲染出来的HDR图像就是个线性的数据,所以直接就在ACES空间中。而输出的时候需要一次tone mapping,转到LDR或另一个HDR。也就是说,我们只要ACES里的非常小的一条路径,而不是纷繁复杂的整套体系。
「ACES Filmic Tone Mapping Curve」中拟合的也是一条 S 曲线,可见和专业人士提供的曲线(虚线)重合度已经很高了,因此现在主流 3D 引擎(包括 clay.gl)HDR 方案也都是选择的这种方法: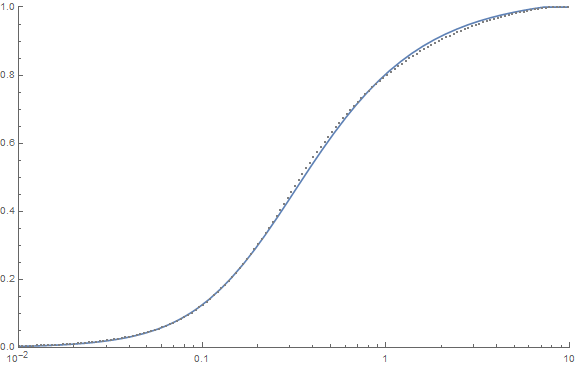
vec3 ACESToneMapping(vec3 color)
{
    const float A = 2.51;
    const float B = 0.03;
    const float C = 2.43;
    const float D = 0.59;
    const float E = 0.14;
    return (color * (A * color + B)) / (color * (C * color + D) + E);
}
Unreal 中的实现
https://docs.unrealengine.com/en-us/Engine/Rendering/PostProcessEffects/ColorGrading
As of Unreal Engine version 4.15, the filmic tone mapper was enabled as the default tone mapper.
拟合 S 曲线的在线展示:
https://www.desmos.com/calculator/h8rbdpawxj
曝光度
曝光度是可以调节的,当超过默认值 1 时,ToneMapping 会将 HDR 映射到 LDR。
以下是 clay.gl 中的实现:
uniform float exposure : 1.0;

// Adjust exposure
// From KlayGE
#ifdef LUM_ENABLED
    float fLum = texture2D(lum, vec2(0.5, 0.5)).r;
    float adaptedLumDest = 3.0 / (max(0.1, 1.0 + 10.0*eyeAdaption(fLum)));
    float exposureBias = adaptedLumDest * exposure;
#else
    float exposureBias = exposure;
#endif

// 应用曝光度进入 HDR
texel.rgb *= exposureBias;
// 通过 ACES ToneMapping 映射成 LDR
texel.rgb = ACESToneMapping(texel.rgb);
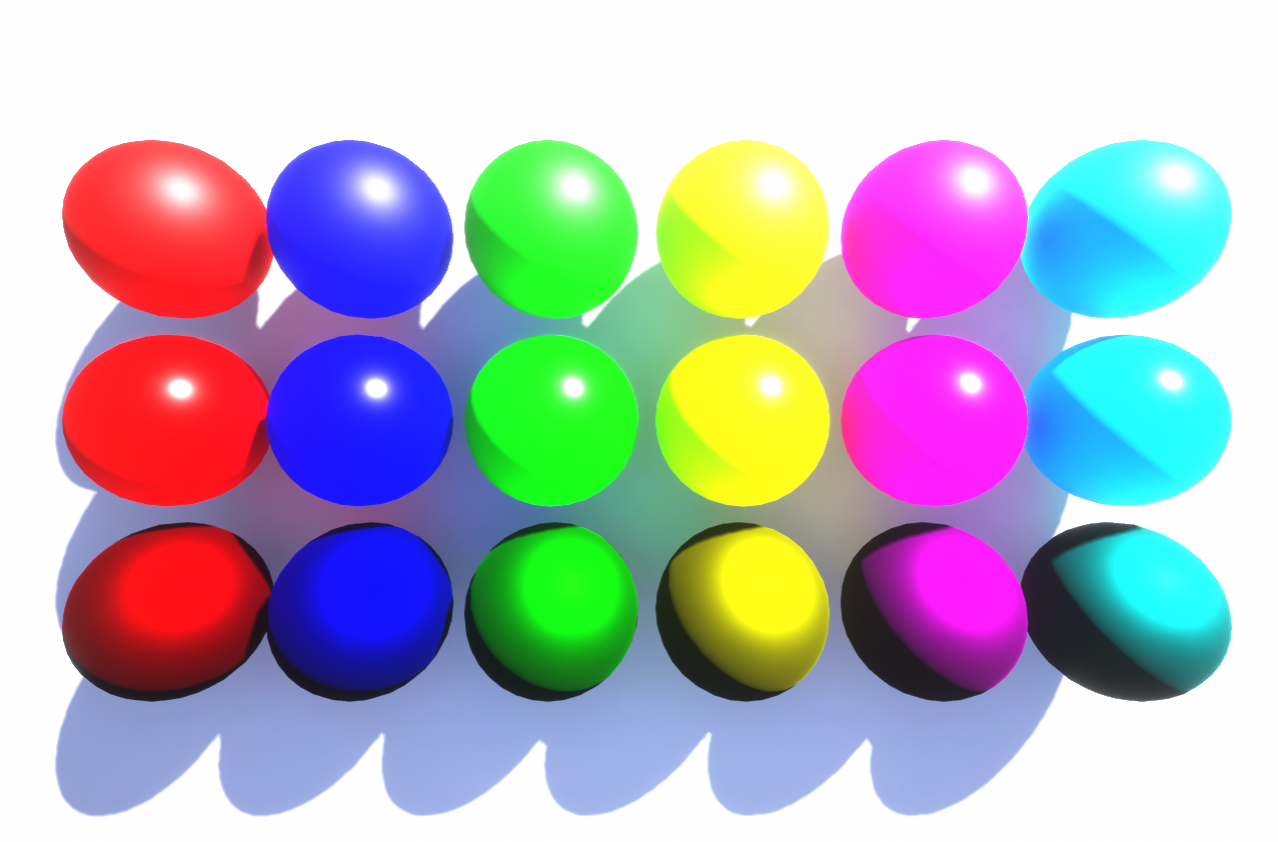
来自 Unreal 同样曝光度设为 3,应用了 ACES 之后(左侧)明显比老版本的 ToneMapping (右侧)保留了更多细节: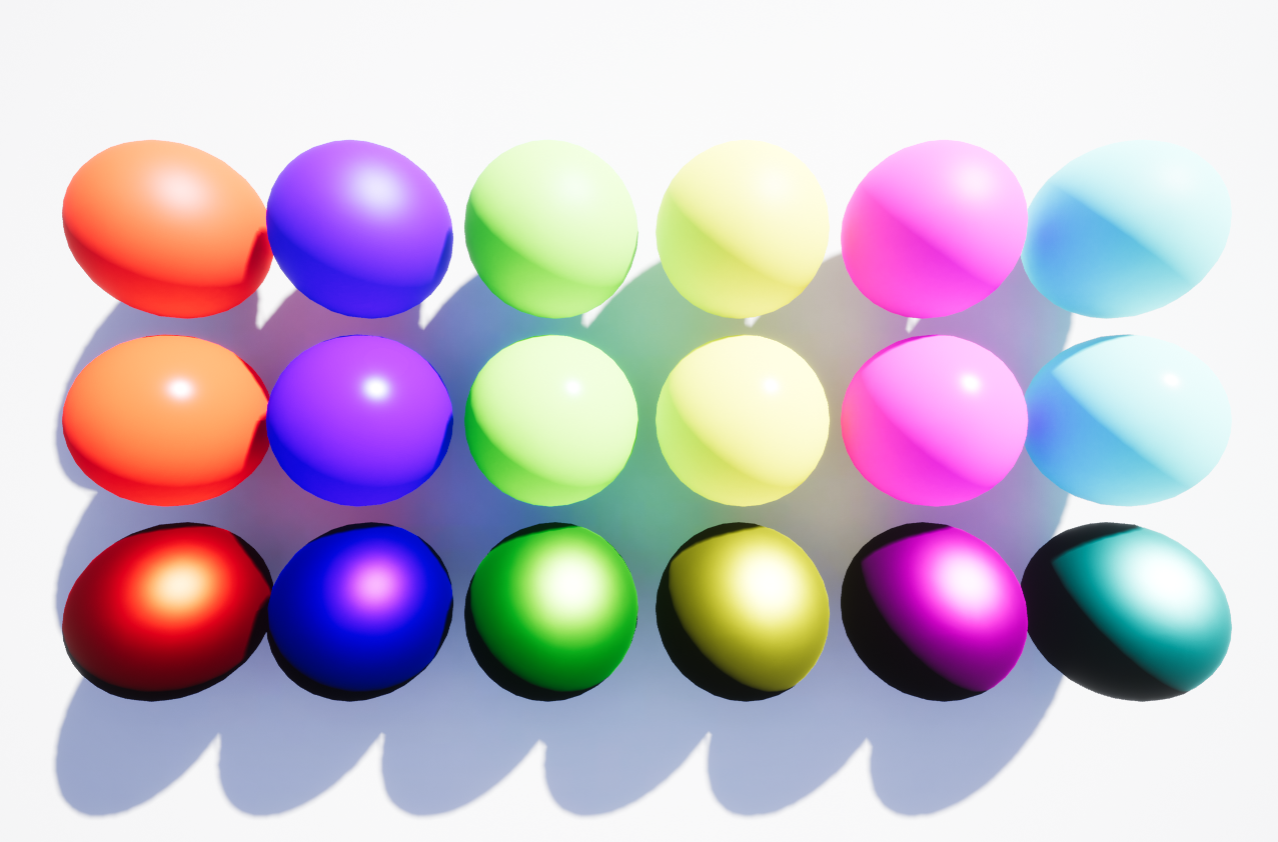
RGBM
现在我们有了各种各样的 Tone Mapping 算法,那么一个关键的问题是,如何存储这些超出 0 -255 范围的 RGB 颜色值呢?
先来看看 clay.gl 中是怎么做的,在需要使用 HDR 的地方提供了 decode 和 encode 函数:
@export clay.util.rgbm
@import clay.util.rgbm_decode
@import clay.util.rgbm_encode

vec4 decodeHDR(vec4 color)
{
#if defined(RGBM_DECODE) || defined(RGBM)
    return vec4(RGBMDecode(color, 8.12), 1.0);
#else
    return color;
#endif
}

vec4 encodeHDR(vec4 color)
{
#if defined(RGBM_ENCODE) || defined(RGBM)
    return RGBMEncode(color.xyz, 8.12);
#else
    return color;
#endif
}

@end
那么这里的 RGBM 又是什么呢?下面就通过以下两篇文章来了解一下:
相较 LogLuv 涉及的 log 运算,RGBM 编码时在 a 分量中存储的是亮度的 range,因此 decode 时特别简单。
关于这个 range 的值,原版中定义为 6,clay.gl 中则定义为 8.12:
@export clay.util.rgbm_decode
vec3 RGBMDecode(vec4 rgbm, float range) {
  return range * rgbm.rgb * rgbm.a;
}
@end

@export clay.util.rgbm_encode
vec4 RGBMEncode(vec3 color, float range) {
    if (dot(color, color) == 0.0) {
        return vec4(0.0);
    }
    vec4 rgbm;
    color /= range;
    rgbm.a = clamp(max(max(color.r, color.g), max(color.b, 1e-6)), 0.0, 1.0);
    rgbm.a = ceil(rgbm.a * 255.0) / 255.0;
    rgbm.rgb = color / rgbm.a;
    return rgbm;
}
@end
当然除了这两种编码方式,还有 http://lousodrome.net/blog/light/tag/rgbm/ 中提到的 RGBE 等若干种。


